Although we had covered numerous important tips & tricks in our latest book, there were still few tips that weren't mentioned, due to the final page count:
1-When network rendering, at times one may encounter missing bitmap errors whilst rendering. To correct this, simply check the "include maps" function, on the options group from the "network job assignment" dialog.However, it may slow the renders slightly.
The rule of thumb is to avoid having missing bitmaps or/and uvw maps in your Max scene.

2-When sending Max files to render over the network, ensure that the file/s are not over 90/150 MB in size, as the backburner may not be able to upload it to render.Professionals often use proxies to prevent files from reaching such sizes.Proxies are covered in detail in our latest book.
3-Backburner retains (saved) all Max files listed on the job queue, in case one may require retrieving them. These files are normally saved in:
C:\Documents and Settings\ ... \Local Settings\Application Data\backburner\ ServerJob
OR
C:\Program Files\Autodesk\Backburner\Network\ServerJob
4-When using the, "connect to manager" tool, one may be required to enable the "automatic search" function, in order to locate the backburner manager. Network rendering is also covered in detail in our latest book.
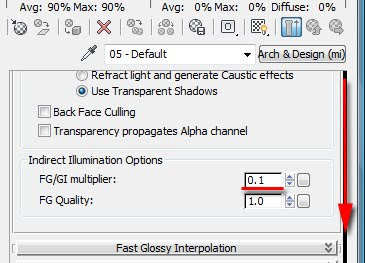
5-When rendering highly reflective surfaces, the shadows may not be very apparent (this is a natural phenomenon). To make the shadows more apparent, simply reduce the amount of reflectivity or/and reduce the fg/gi multiplier values, under the "indirect illumination" material group options. This Arch & Design function has been covered in detail in our latest book.

6-Often, imported Cad files and survey data are too far away from the point 0 in Max, which may subsequently cause problems creating splines, lights etc. To prevent this, users often move the drawings to point 0 in AutoCAD, prior to importing them into Max.
With survey data points, users first match everything from the original points in Max; once all details are confirmed and rectified (i.e. survey data, context models etc), everything is then moved to/closer to point 0, for lighting, materials etc. Verified views are also covered in detail in our latest book.
7-In Max 2010,after enabling the "read FG points only from existing map files", any new object/s created/added to the scene may still render ok,without the need to re compute the FG files again.
However, the light bounces of the new object/s may not be taken into consideration(i.e. colour bleeding,etc).
One should avoid such situations (i.e. re compute the FG solution if new objects/light had been added in the scene or/and objects have been moved) to avoid unexpected results.
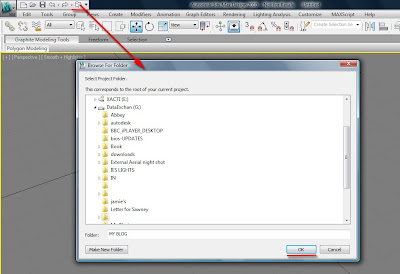
8-One quick way to map the Max browser to your project folder is to click open on the "project folder" tool, on the main tool bar.
Once set, at your command, Max will begin browsing from the pre defined location, by default.

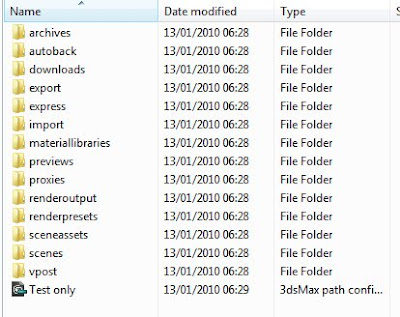
It is worth mentioning that whilst Max is setting the main browser location; it also creates automatically standard Max subfolders (i.e. Archives; autoback etc).

Video Captions available (CC)
Video Captions available (CC)
Video Captions available (CC)
Checkout below my other Courses with High Resolution Videos, 3d Project files and Textures included.
Also, please Join my Patreon page or Gumroad page to download Courses; Project files; Watch more Videos and receive Technical Support. Finally, check my New channels below:
More tips and Tricks:
| Course 1: Exterior Daylight with V-Ray + 3ds Max + Photoshop Course 2: VRay 3ds Max Interior Rendering Tutorials |
| Course 3: Exterior Night with V-Ray + 3ds Max + Photoshop |
| Course 4: Interior Daylight with V-Ray + 3ds Max + Photoshop |
| Course 5: Interior Night with V-Ray + 3ds Max + Photoshop |
|
Also, please Join my Patreon page or Gumroad page to download Courses; Project files; Watch more Videos and receive Technical Support. Finally, check my New channels below:
More tips and Tricks:
Post-production techniques
Tips & tricks for architectural Visualisation: Part 1
Essential tips & tricks for VRay & mental ray
Photorealistic Rendering
Creating Customised IES lights
Realistic materials
Creating a velvet/suede material
FoxRenderfarm
www.arroway-textures.com
Renderpeople
Gobotree


I also noticed (if you dont want to take time for backburner to transfer maps too all of your PC's), that it helps to place all your maps (bitmaps, final gather maps, IES files) in a network folder so that each PC in your render farm has the same network path to "look" for the maps.
ReplyDeleteYes indeed!Thanks for pointing out Dustin!!
ReplyDeleteTa
Jamie